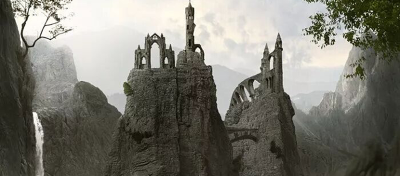
Photo manipulation is the art of combining elements from different images to create a scene that never existed. It is the backbone of movie posters, album covers, and advertising campaigns.
Start with Good Source Images
The most common beginner mistake is compositing images with mismatched lighting, perspective, and resolution. Pay attention to:
Lighting direction and quality. All elements should have light from roughly the same direction.
Perspective and camera angle. An object photographed from above will look wrong in an eye-level scene.
Resolution. Use source images of similar resolution.
Technique 1: Clean Selections and Masking
Quick Selection Tool: Good for elements with clear edges against contrasting backgrounds.
Pen Tool: The most precise method.
You manually draw a path around the object. Essential for complex outlines.
Select and Mask workspace: The Refine Edge Brush is particularly useful for hair and fur.
Always output selections as a layer mask rather than deleting the background. Masks are non-destructive.
Technique 2: Color and Tone Matching
Curves Adjustment Layer: Clip to your subject layer and adjust Red, Green, and Blue channels to match the background.
Color Balance: Adjust shadows, midtones, and highlights separately.
Match Color command: Image > Adjustments > Match Color.
Good starting point but usually needs refinement.
Saturation matching: Bring all elements to a similar saturation level using Hue/Saturation adjustments.
Technique 3: Shadows and Depth
Contact shadows: Paint a thin, dark shadow where the object touches the surface. This tiny detail makes an enormous difference.
Cast shadows: Create longer shadows matching the light direction.
Use Transform with Skew and Distort. Apply Gaussian Blur and reduce opacity.
Atmospheric depth: Objects in the distance should be hazier, less saturated, and slightly lighter.
Technique 4: Blending with Layer Modes
Multiply: Darkens. Useful for shadows and dark textures. White pixels become invisible.
Screen: Lightens. Perfect for light effects and glowing elements. Black pixels become invisible.
Overlay and Soft Light: Increase contrast. Great for texture overlays that add surface detail.
Technique 5: Adding Texture and Grain
Different source images often have different noise levels. To unify your composite, add a noise layer on top of everything. Create a new layer filled with 50% gray. Filter > Noise > Add Noise (1-3%, monochromatic). Set blend mode to Overlay. This adds consistent grain that ties all elements together.
Technique 6: Final Unifying Adjustments
Color Lookup (LUT): Shifts all colors through the same filter. Makes disparate elements feel cohesive.
Global Curves: A subtle S-curve increases contrast uniformly.
Vignette: Darkens edges to draw the eye toward the center.
Practice Projects
Project 1: Simple background swap. Focus on clean selection and color matching.
Project 2: Add a new object to an existing photo. Focus on perspective and shadow creation.
Project 3: Surreal composite with three or more images. Exercises all techniques at once.
Photo manipulation is a skill that develops with practice. Your first composites will look rough. Each one teaches you something that makes the next one better.